前回までで、ステージ、player、ballの挙動まで終了していると思います。
前回記事 https://h2blo.com/unity/hockey/
今回は得点処理、シーンの変遷、効果音を追加して、ゲームとして遊べるようにして完成です。
ゴールと得点処理を追加する
ProjectのCreateからScriptを生成、名前をGoal1とする。下記コードをコピペする。
using System.Collections;
using System.Collections.Generic;
using UnityEngine;

public class Goal1 : MonoBehaviour
{
    public AudioClip sound2;
    private AudioSource audioSource;

    // Start is called before the first frame update
    void Start()
    {

    }

    // Update is called once per frame
    void Update()
    {

    }
    private void OnTriggerEnter(Collider collider)
    {
        Rigidbody rigidbody = GetComponent<Rigidbody>();
        if (collider.gameObject.tag == "goal2")
        {
            rigidbody.velocity = Vector3.zero;
            rigidbody.angularVelocity = Vector3.zero;
            FindObjectOfType<score1>().AddPoint(1);
            audioSource = GetComponent<AudioSource>();
            audioSource.PlayOneShot(sound2);
        }
    }
}
これをballにドラッグする。
もう一つ同じようにスクリプトを作成、名前をGoal2とし、下記コードをコピペ。
using System.Collections;
using System.Collections.Generic;
using UnityEngine;

public class Goal2 : MonoBehaviour
{
    public AudioClip sound2;
    private AudioSource audioSource;

    // Start is called before the first frame update
    void Start()
    {

    }

    // Update is called once per frame
    void Update()
    {

    }
    private void OnTriggerEnter(Collider collider)
    {
        Rigidbody rigidbody = GetComponent<Rigidbody>();
        if (collider.gameObject.tag == "goal")
        {
            rigidbody.velocity = Vector3.zero;
            rigidbody.angularVelocity = Vector3.zero;
            FindObjectOfType<score2>().AddPoint(1);
            audioSource = GetComponent<AudioSource>();
            audioSource.PlayOneShot(sound2);
        }
    }
}
これもballにドラッグする。
次に、壁のCube(左側の壁)のInspector内のTagをgoalにする。
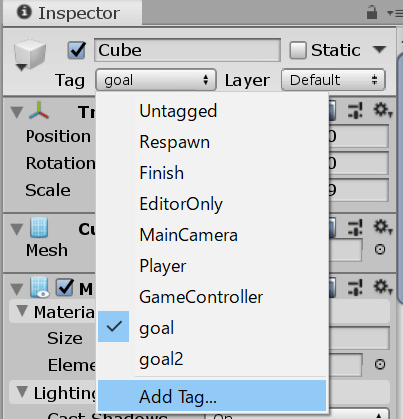
Add Tagから新しいTagが生成できる。
右側の壁Cubeにも同じようにTagをgoal2にする。
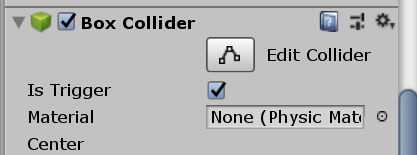
GoalのBox ColliderのIs Triggerにチェックを入れる。
次にHierarchyのCreateからUI→Canvasを選択する。Textも同時に生成されるはず。このTextをCtrlキー+Dで4つドロップする。
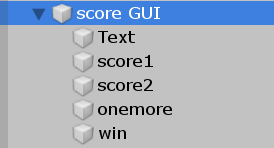
こんな感じ。Textには”とくてん”と表記させる。
score1、2には、”0”と記入。
残りはTextを空欄にする。
Project→Create→Scriptを生成、名前をscore1として、下記コードをコピペする。
using System.Collections;
using System.Collections.Generic;
using UnityEngine;
using UnityEngine.UI;
using UnityEngine.SceneManagement;

public class score1 : MonoBehaviour
{
    public Text scoreText;
    public Text win;
    public Text onemore;
    public static int score;

    // Start is called before the first frame update
    void Start()
    {

    }

    // Update is called once per frame
    void Update()
    {
        scoreText.text = score.ToString();
        if (score >= 5)
        {
            if (Input.GetKey("space"))
            {
                score = 0;
                score2.score = 0;
                SceneManager.LoadScene("game1");
            }
        }
    }

    public void AddPoint(int point)
    {
        score = score + point;
        StartCoroutine("coroutine");
        if (score >= 5)
        {
            win.text = "1P win!!";
            onemore.text = "push space";
        }
    }

    IEnumerator coroutine()
    {
        yield return new WaitForSeconds(2f);
        if (score <= 4)
        {
            SceneManager.LoadScene("game2");
        }
    }
}
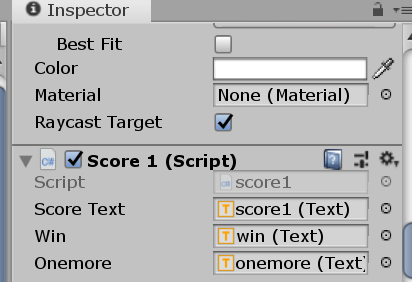
これをHierarchyのscore1にドラッグする。
このように設定する↓
同じようにして、score2用のスクリプトを作成する。コード↓
using System.Collections;
using System.Collections.Generic;
using UnityEngine;
using UnityEngine.UI;
using UnityEngine.SceneManagement;

public class score2 : MonoBehaviour
{
    public Text scoreText;
    public Text win;
    public Text onemore;
    public static int score;
    // Start is called before the first frame update
    void Start()
    {

    }

    // Update is called once per frame
    void Update()
    {
        scoreText.text = score.ToString();
        if (score >= 5)
        {
            if (Input.GetKey("space"))
            {
                score = 0;
                score1.score = 0;
                SceneManager.LoadScene("game1");
            }
        }
    }

    public void AddPoint(int point)
    {
        score = score + point;
        StartCoroutine("coroutine");

        if (score >= 5)
        {
            win.text = "2P win!!";
            onemore.text = "push space";
        }
    }

    IEnumerator coroutine()
    {
        yield return new WaitForSeconds(2f);
        if (score <= 4)
        {
            SceneManager.LoadScene("game1");
        }
    }
}
Inspectorのscore Textをscore2にするように。
これでゴールの設定はひとまず完成。
次は得点したら、シーンを切り替えて再スタートさせるため、シーンを追加する。
シーンの追加
Project→Create→Scene→名前をgame2にする。
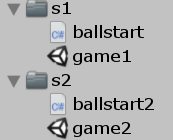
unityロゴが付いたものが生成されるので、ダブルクリック。(保存を忘れずに!)
今まで作成したものがない別のSceneに切り替わるので、Scene(game1)で作成したHierarchyのオブジェクトをすべてgame2にコピペする。(ballの初期位置だけ反対側のプレイヤーにする。)
下記コードをコピペした、名前Ballstart2のスクリプトを作成。
using System.Collections;
using System.Collections.Generic;
using UnityEngine;

public class ballstart2 : MonoBehaviour
{
    public float speed = 6;
    private Vector3 pos;
    bool One;
    // Use this for initialization
    void Start()
    {
        One = true;
    }
    // Update is called once per frame
    void Update()
    {
        if (One)
        {
            if (Input.GetKey("up"))
            {
                transform.position += transform.forward * speed * Time.deltaTime;
            }
            if (Input.GetKey("down"))
            {
                transform.position -= transform.forward * speed * Time.deltaTime;
            }
            if (Input.GetKey(KeyCode.Space))
            {
                var force = (transform.forward - transform.right) * 3.5f;
                GetComponent<Rigidbody>().AddForce(force, ForceMode.VelocityChange);
                One = false;
            }
            Clamp();
        }

        // ★追加
        // プレーヤーの移動できる範囲を制限する命令ブロック
        void Clamp()
        {
            // プレーヤーの位置情報を「pos」という箱の中に入れる。
            pos = transform.position;

            pos.z = Mathf.Clamp(pos.z, -4, 4);

            transform.position = pos;
        }
    }
    void OnCollisionEnter(Collision collision)
    {
        if (collision.gameObject.tag == "Player")
        {
            Rigidbody rigidbody = GetComponent<Rigidbody>();
            rigidbody.velocity = rigidbody.velocity * 1.13f;
        }
    }
}
これをballにアタッチ。Ballstartスクリプトのチェックをはずす。
これで別シーンが完成したので、再生してゴールしたらシーンが自動で切り替わるようになっているはずです。
効果音の追加
スクリプト新たに生成、名前をSEとして、下記コードをコピペ。
using System.Collections;
using System.Collections.Generic;
using UnityEngine;

public class SE : MonoBehaviour
{
    public AudioClip sound1;
    private AudioSource audioSource;
    // Start is called before the first frame update
    void Start()
    {
        audioSource = GetComponent<AudioSource>();
    }

    // Update is called once per frame
    void Update()
    {

    }

    void OnCollisionEnter(Collision collision)
    {
        audioSource.PlayOneShot(sound1);
    }
}
これをballにアタッチする。効果音は自身で用意してください。
ballのInspector内で SEスクリプトとゴールスクリプトに sound設定する欄があるので、好きな効果音を設定するだけです。
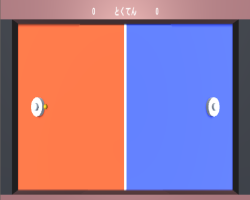
これにて完成!!お疲れ様でした。PC限定でいつでも遊べるようになってますので、よかったらどうぞw↓↓
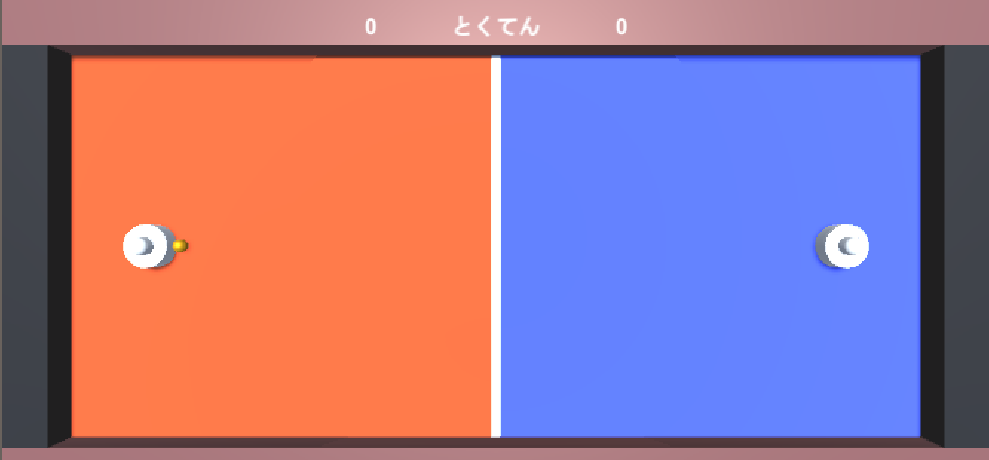
そして元ネタがこれ↓↓よかったら見てください。ホッケーは15:30辺りからやってます。



コメント
Goal2のスクリプトがドラッグできません
Goal1はできました
コメントありがとうございます。返信が遅くなり申し訳ありません。
スクリプトがドラッグできない?ならばGoal1スクリプトのif文の下にGoal2の
if (collider.gameObject.tag == “goal”)
{
rigidbody.velocity = Vector3.zero;
rigidbody.angularVelocity = Vector3.zero;
FindObjectOfType<score2>().AddPoint(1);
audioSource = GetComponent<AudioSource>();
audioSource.PlayOneShot(sound2);
}
部分を追加したら動きませんか?
こんがらないようにスクリプト分けしているだけだったので。